Qlik Extension Development and API Calls
Qlik Extension Development
I recently had a requirement to add a button to download an NPrinting report without navigating from the sheet of an app. At first glance, I thought I would use the NPrinting On-Demand report generator that Qlik supports, but I found a few issues using it. The required button was to generate a report on another app, and while the app with the button had some filters with ‘only one selected value’ on a field, the report was supposed to loop through the values in the restricted field & produce a PowerPoint presentation. Here are some of the issues
- The NPrinting On-Demand report generator can generate a report from the current app or another app. However, when generating from another app, it worked similar to ODAG report generation in that it passed selections to the 2nd app. This filtered our results in the report.
- The NPrinting report took some time to generate. Our solution could run a job every morning & create the report before the user requested it.
- Each user has a different “shared folder” for the download, meaning that the GUID for the folder changed for each user. This made it impossible to hard-code the solution (and who wants to hard-code a solution anyway…)
Lucky for me, I had finished updating an extension that populates a sidebar with the stream, app, & page for navigation so that the user never accesses the Qlik hub, and the API calls for the NPrinting report are executed the same way. Development of this button only took a couple of hours. Here is how.
How to develop extensions in Qlik
Qlik client-side extensions use Javascript, HTML and CSS. Javascript is where the magic happens, so let’s start there.
Starting off: use a template
First, this extension will be built in the Qlik Dev Hub. As far as I know, the desktop version does not support the API calls we will be making.
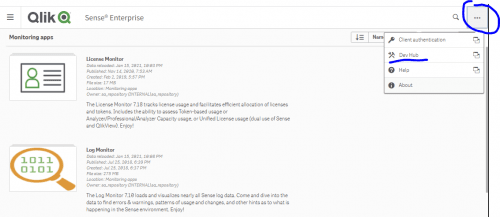
Navigate to the Dev Hub by logging onto your Qlik enterprise instance and clicking the ellipsis on the top right of the page.
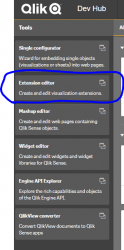
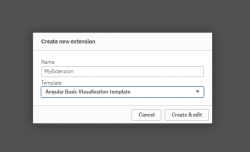
From here, navigate to Extension Editor, create an extension, provide a name & select “Angular Basic Visualization template.” Although I do not use angular in this extension, this template provides the bones I work with in my extension.
Template layout
There should be 3 tabs open in your development area now, a .qext, .js, and .html tab. We will ignore the .qext tab during this blog, and change up the angular references in the .js and .html. I will not go into deep detail on how all of this works as I want to focus on my solution, so let’s get to work. We’ll start on the .js tab which should look like this:
define( ["qlik", "text!./template.html"],
  function ( qlik, template ) {
    return {
    template: template,
    support: {
      snapshot: true,
      export: true,
      exportData: false
    },
    paint: function () {
      return qlik.Promise.resolve();
    },
    controller: ['$scope', function ( $scope ) {
      //add your rendering code here
      $scope.html = "Hello World";
    }]
  };
} );
We will be adding all our code in the controller, so let’s get started.
Ajax calls
Ajax calls are the way we will perform a request to the Qlik engine to retrieve results. Check out the documentation of Ajax calls on W3schools.com here. This is the syntax we’ll use:
$.ajax({
    url: "endpoint here",
    type: "GET",
    headers: {
      "add here"
    },
    success: function (object){
      //do something
    },
    error: function (error){
      console.log(error);
    }
});
The URL is where I would add my endpoint for my Qlik request, and then handle the request-response after “success”. Logging the response is a good way to start & inspect the object; log as follows by pasting the line below under the ‘//do something’ line.
console.log(object);
This will log out the response on the developer web console on the webpage (Qlik Sense page) that the extension is dropped into.
Endpoints for Qlik: QRS & QPS
From here, I looked up the endpoint for shared content libraries on Qlik Sense in the QRS API documentation. The endpoint I need to hit is “/qrs/sharedcontent/full”. The documentation also indicates what parameters are necessary, so in the end my ajax request looked like this:
$.ajax({
   url:"/qrs/sharedcontent/full?xrfkey=GAMG717cpRsrx7xR",
   type: "GET",
   headers: {
     "X-Qlik-XrfKey":"GAMG717cpRsrx7xR"
   },
   success: function (sharedContent){
     console.log(sharedContent);
   },
   error: function (error){
     console.log(error);
   }
});
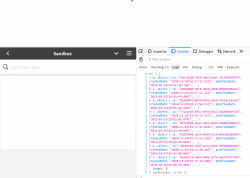
Dropping the extension on a sheet in Qlik Sense, I can inspect my sharedContent library by opening developer tools on the webpage. There should be an array logged out that looks something like this when expanded.
Each of the objects in this array is a sharedContent library that belongs to a user. I only need the current user, so I have to add a filter. Filters can be passed in the Ajax call, and I can use a qps endpoint to retrieve the current user (n.b. there is an endpoint in the QRS for users, but this will retrieve all users. Since we want to get the current user, the Qlik Proxy Service endpoint (qps) is the best to use). Now I have a 2nd Ajax request:
"/qps/user"
Asynchronous Javascript
I now call this endpoint first & use the response to filter the sharedContent call. It is important to note here that Javascript is an asynchronous language, meaning that it does not execute line 1, then line 2. It can execute several commands at the same time, and dependencies must be embedded within the call to ensure data is available. This is what our filtered sharedContent library call will now look like, embedded within our User call:
$.ajax({
  url:"/qps/user?xrfkey=GAMG717cpRsrx7xR",
  type: "GET",
  headers: {
    "X-Qlik-XrfKey":"GAMG717cpRsrx7xR"
    },
  success: function (user){
    $.ajax({
      url:"/qrs/sharedcontent/full?xrfkey=GAMG717cpRsrx7xR&filter=owner.name eq '" + user.userName + "'",
      type: "GET",
      headers: {
        "X-Qlik-XrfKey":"GAMG717cpRsrx7xR"
      },
      success: function (sharedContent){
        console.log(sharedContent);
      },
      error: function (error){
       console.log(error);
      }
    });
   },
   error: function (error){
     console.log(error);
   }
});
Save the script & refresh the Qlik Sense page. Now there should only be one shared library belonging to the current user (or none if the current user does not have a shared library).
Filtering response
The filtering API call documentation provided by Qlik is a great area to become acquainted with if looking to add filters to calls.
Final items: handling object
Now that I had all the information in my call that I needed (notice that I did not filter based on report name – I only have one report from NPrinting at this time, so I did not need to do that. An instance with more than one report would have required another filter), I just needed to retrieve the proper URL. I found that there were versions offered by NPrinting within the object, so I had several URLs. I decided I wanted only the most recent, and since the url was structured as /sharedcontent/[GUID]/[TimeStamp of report]/[ReportName], I created an array and sorted it descending. Then I used the first sorted value as my URL.
success: function (sharedContent){
   console.log(sharedContent);
   var nPrintingEndpoint = []; //empty array
   for(i=0;i < sharedContent[0].references.length;i++){
       nPrintingEndpoint.push(sharedContent[0].references[i].externalPath);
   }
   //console.log(nPrintingEndpoint);
   nPrintingEndpoint.reverse();
   window.open(nPrintingEndpoint[0], '_blank');
}
Target acquired. Now I just need to tie this to the front end.
HTML Binding
Time to bind it. Let’s start with our .html file. It should look like this:
<div qv-extension style="height: 100%; position: relative; overflow: auto;" class="ng-scope">
{{ html }}
</div>
I worked on this a little and found after a little research that I could change it to a button & bind it without using the angular {{ html }}. This is what it looked like when I finished:
<div qv-extension style="height: 100%; position: relative; overflow: auto;" class="ng-scope">
    <button class="myQlik-button" id="NPrintButton">Generate My Report</button>
</div>
Now I need to bind it to my javascript. So I made the following changes:
- In the controller, I wrapped my first $.ajax call in a function
- I used my HTML object id with a .onclick to bind the function to my html button
Now the code looks like this:
controller: ['$scope', function ( $scope ) {
    //add your rendering code here
    NPrintButton.onclick = function retrieveReport(){
      $.ajax({
        ...
      });
    }
}]
CSS
Time to brush things up with some CSS. Add a new tab using the “+” symbol on the top right of the screen of the edit extension window. I called the new item styles.css. I added a few things here to make it blend with the custom theme my client was using, and ensure that the object changed when hovered over with the mouse.
styles.css
/* CSS */
.myQlik-button {
    height:100%;
    width:100%;
    background-color: #404040;
    color: #ffffff;
    font-family: "QlikView Sans";
}

.myQlik-button:hover {
    cursor: pointer;
    background-color: gray;
};
Finish this by adding a reference to the styles in the .js document as outlined below:
define( ["qlik", "text!./template.html","css!./styles.css"],
Conclusion
Overall, this experience helped me gain confidence using the Qlik QRS & QPS endpoints. I hope this walk-through might inspire you to jump into the deep end of Qlik Extension development.
Happy Qliking.
